The Ultimate Guide to Screen Recording with Audio on Mac
Screen recording with audio on Mac is essential for creating tutorials, recording meetings, capturing gameplay, and documenting technical issues. While macOS provides built-in recording tools, many users discover a frustrating limitation: the native Screenshot toolbar and QuickTime Player can’t capture internal system audio without additional software. This comprehensive guide explores how to screen record with audio on Mac using both built-in capabilities and professional third-party tools, ensuring you capture both video and sound flawlessly in 2026.
Part 1: Can You Screen Record with Audio on Mac?
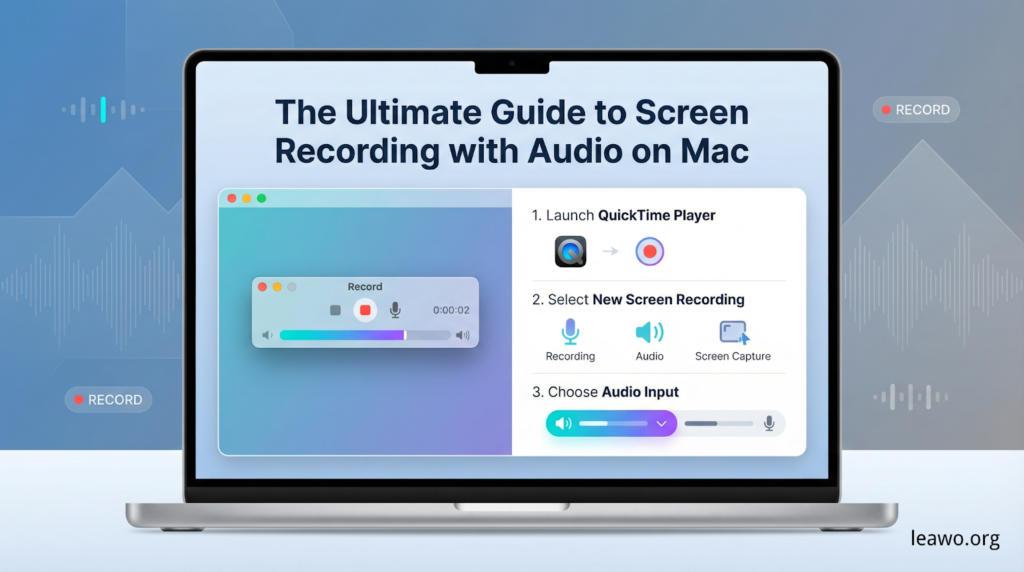
Yes, Mac can screen record with audio, but understanding the built-in capabilities and limitations helps set proper expectations. macOS includes two native recording methods: the Screenshot toolbar (accessed via Command + Shift + 5) and QuickTime Player. Both use the same underlying system tool introduced in macOS Mojave and refined through recent updates including macOS Tahoe 26.
Built-in tools excel at capturing microphone audio. You can easily record voice narration, commentary, or any sound your Mac’s microphone picks up. The Screenshot toolbar offers intuitive controls for full-screen or selected-area recording, with options to show mouse clicks and set recording timers. QuickTime Player provides similar functionality through File > New Screen Recording.
However, these native tools have a critical limitation: they cannot capture internal system audio (the sounds your Mac produces) by default. This means you can’t record audio from YouTube videos, Zoom calls, Spotify playback, app notifications, or any other sound coming from your computer’s speakers without workarounds. Apple implements this restriction for privacy and copyright protection, preventing apps from secretly recording your audio output. While this safeguards users, it frustrates content creators needing to capture system audio for tutorials or presentations.
Part 2: Screen Record with Audio Using Third-Party Tools
Professional screen recorders bypass Mac’s internal audio limitations with integrated solutions requiring no manual audio routing configuration.
1. ScreenFlow
ScreenFlow version 10.5 (released August 2025) leads professional Mac screen recording with comprehensive audio capture capabilities. The software records multiple application audio sources simultaneously, excludes specific applications from recordings, offers timed recordings with automatic start/stop, and provides advanced video editing tools post-recording.
ScreenFlow particularly excels for content creators needing professional-grade recordings with built-in editing. The software captures system audio, microphone input, and even iPhone/iPad screens connected via USB. While the $169 price tag seems steep, the all-in-one functionality eliminates needing separate recording and editing software. For users seeking a screen recorder for Mac with professional features, ScreenFlow delivers exceptional value.
2. Camtasia
Camtasia combines screen recording with powerful video editing in an accessible interface perfect for educators, trainers, and marketing professionals. The software supports multi-track audio recording, built-in royalty-free music and sound effects, interactive quizzes and annotations, and direct publishing to YouTube, Vimeo, and learning management systems.
Version updates in 2025 improved performance on Apple Silicon Macs and added enhanced cursor effects. Camtasia costs $299 for a perpetual license or $319/year subscription, positioning it as a premium solution for businesses and professional content creators.
3. CleanShot X
CleanShot X focuses on screenshots and quick screen recordings with a polished, Mac-native experience. Beyond recording, it offers cloud uploads with automatic link generation, annotation tools for quick edits, scrolling capture for long webpages, and self-timer for prepared recordings.
The $29/year subscription (or $8/month) makes CleanShot X affordable for casual users wanting better functionality than native tools without committing to expensive professional software. It captures system audio seamlessly through its own audio driver.
4. Screen Studio
Screen Studio revolutionizes demo videos with automatic zoom effects, smooth cursor tracking, beautiful device frames, and AI-generated transcripts and subtitles. The software automatically detects your device model and color, adding authentic-looking frames to iPhone or iPad recordings.
Priced at $89 one-time purchase, Screen Studio targets developers, product marketers, and designers creating polished promotional videos. User testimonials consistently praise its ability to make simple screen recordings look professionally produced with minimal effort. For Windows users seeking similar capabilities, a free screen recorder for PC alternative provides basic functionality without Mac-specific polish.
Part 3: Screen Record with Audio with a Virtual Audio Driver
For users wanting to use free native tools (QuickTime Player or Screenshot toolbar) while capturing system audio, virtual audio drivers provide the solution. BlackHole stands as the most popular free option.
Step-by-Step Setup:
- Download BlackHole from the official GitHub repository. Choose BlackHole 2ch (stereo) for most use cases or 16ch for advanced multi-channel routing.
- Install BlackHole by opening the downloaded .pkg file and following installation prompts. Grant necessary permissions when macOS requests them.
- Create a Multi-Output Device to hear audio while recording. Open Audio MIDI Setup (search via Spotlight or find in Applications > Utilities). Click the plus button at bottom-left and select “Create Multi-Output Device.” In the right panel, check both “Built-in Output” and “BlackHole 2ch.” This routes audio to both your speakers and the virtual driver.
- Set System Output by clicking the Apple menu > System Settings > Sound. Under Output, select “Multi-Output Device” you just created. Test by playing any audio – you should hear it normally through speakers.
- Configure QuickTime or Screenshot Toolbar by opening QuickTime Player and selecting File > New Screen Recording, or pressing Command + Shift + 5 for the Screenshot toolbar. Click Options and under Microphone, select “BlackHole 2ch.”
- Start Recording and play content with system audio. Your recording now captures both video and internal sound.
- Switch Back when finished by returning to System Settings > Sound and selecting “Built-in Output” to restore normal audio routing.
Optional: Record Both Microphone and System Audio
To capture your voice alongside system audio, create an Aggregate Device in Audio MIDI Setup combining BlackHole with your microphone input. Click the plus button, select “Create Aggregate Device,” and check both “BlackHole 2ch” and your microphone source. Select this Aggregate Device as your microphone input in recording software.
Part 4: Conclusion
Mac screen record with audio in 2026 offers multiple pathways matching different needs and budgets. Native tools (Screenshot toolbar and QuickTime) work perfectly for microphone-only recordings like narrated demos. For system audio capture without spending money, BlackHole virtual audio driver paired with native tools provides free functionality, though setup requires technical steps.
Professional third-party software like ScreenFlow, Camtasia, CleanShot X, and Screen Studio eliminate technical hassles through integrated audio capture and enhanced features. ScreenFlow leads for all-around professional work, Camtasia excels for educational content, CleanShot X suits casual users wanting simplicity, and Screen Studio transforms simple recordings into polished demos.
Choose based on your specific requirements: frequency of recording, need for editing capabilities, budget constraints, and technical comfort level. Test free trials before purchasing premium software, and remember that proper audio configuration matters more than expensive tools for quality results.